Development Pacta

Git Submodule from Existing Path with Branches

This article will show you how you can migrate an existing path within an existing project into a new project, then add that new project as submodule to the original project, while keeping all tags and branches. Typically, branches are lost in migration, but not with this little addition.

Fill a New Repository With a Complete Sub Path of Another Repository

You clone the original project, then filter to the path you want to extract, change the origin and push everything to the new origin. But with only that, this will not copy all the existing branches. Only if you first checkout all branches, then they will also be pushed to the new location. This is what the for-loop does for you.

git clone git@server.url:path/to/original-project.git
cd original-project
git filter-branch --tag-name-filter cat --subdirectory-filter path/to/submodule -- --all
for b in $(git branch -r); do
    git checkout ${b#origin/}
    git reset --hard $b
    git fetch
    git reset --hard ${b#origin/}
done
git remote remove origin
git remote add origin git@server.url:path/to/new-sub-project.git
git push origin --all

Now you have a new repository that contains only a part of the previous one.

Replace a Path with a Submodule

Next step is to replace the path in the old repository by the new repository as a submodule. Clone the original project again (delete the previous clone).

git clone git@server.url:path/to/original-project.git
cd original-project
git rm -rf path/to/submodule
git commit -am "remove old path/to/submodule"
git submodule add git@server.url:path/to/new-sub-project.git path/to/submodule

Now you have replaced path/to/submodule by a new submodule.

Development

Even Longer Way To a Stable Cloud

It is important to control your own data on your own servers. A «cloud» is nothing but running your data on someone else’s computer, and thus they control your data, not you. Encryption may help a little bit, but the best solution is to fully own your data and infrastructure. This is also the philosophy of Pacta Plc: We do not store data on hardware that we do not own. We may use external clouds or servers, but not where customer data is involved. We protect your data.

Running a full stable infrastructure is not a simple task, and there is much to learn. So here you find the story of my adventures when learning and setting up a full cloud infrastructure, as it is also currently used by Pacta Plc.

History

1995 – 2010 Outdated Workstations as Server

I’m running my own server for my websites, e-mail, chat and much more since the nineties. It was always on a single computer with many services in a shared bare metal environment. In the beginning, I ran the server on my workstation, then on an old Siemens workstation that I inherited from my employer.

2011 Root Server and HP ProLiant Micro Server

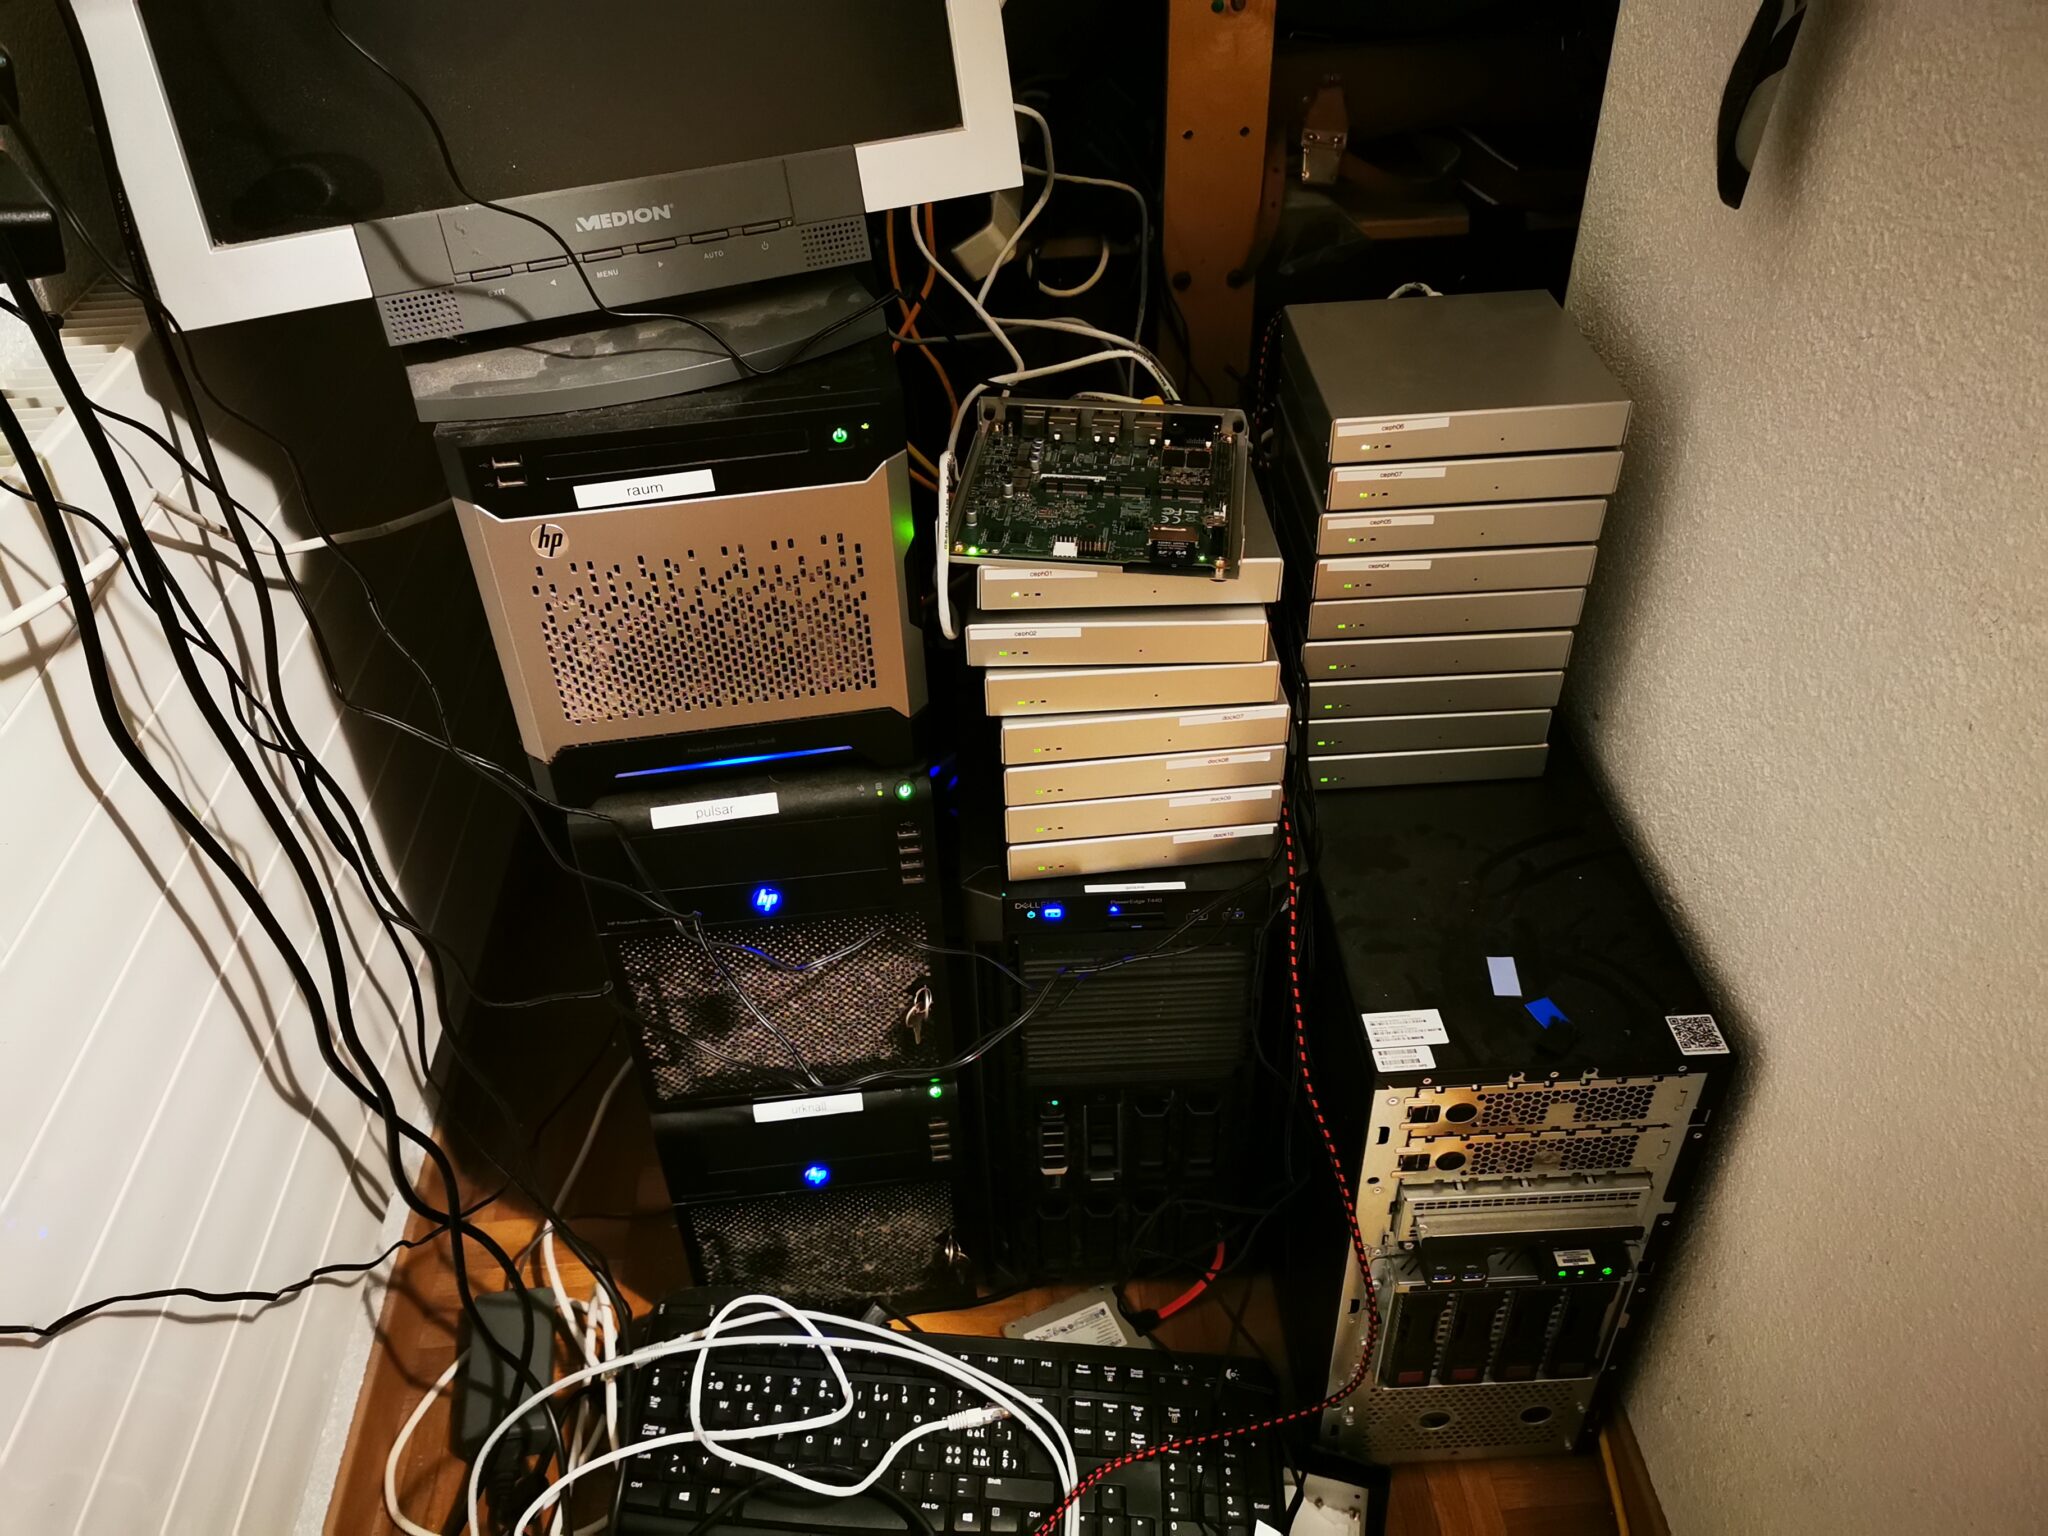
Later I hired a root server and in 2011 I bought my first dedicated HP ProLiant micro server. Up to now, I have three of them. On those machines, processes were directly started with no virtualization.

2015 Docker

In 2015, I started my first experiments with Docker and started to migrate my services from the standalone bare metal servers to Docker containers. For this, I built dozens of images.

Constantly Extending Hard Disks

Over time the HP ProLiant server became brothers and sisters, so that I currently have three of them, plus two huge Servers, storing more and more data. Whenever there is no more space on the hard disk, in Linux, you can easily extend it or replace a drive without downtime, only with a single reboot.

2017 – 2018 From Kubernetes to Docker Swarm

Then in 2017, Kubernetes came in to my focus. But that’s totally overcomplicated. With Docker Swarm there is a much simpler and much more stable solution available. There’s no need for Kubernetes nor OpenShift, unless you want to loose your time. So in 2018 I’ve setup a Docker Swarm on some cheap PC-Engines mini workers.

2017 GlusterFS

But with a swarm solution, there is need for a distributed cluster filesystem, so I came across GlusterFS, which turned out to be a complete disaster. At the beginning, it was very promising, but later, when filled with terrabytes and terrabytes of data, it became slow and very unstable.

2018 LizardFS

So I started a research which pointed me to LizardFS. The Result is much more stable than GlusterFS, but still slow. Other than for GlusterFS, the LizardFS development team was really helpful and assisted me in getting it up relatively fast and stable. But especially the masters tend to require huge amounts of memory. That’s why I bought a large HP and a large Dell server as master and backup master server. The whole LizardFS now holds 90TB of data.

2020 CephFS

Since about 2020, I experiment with CephFS, which is my currently proposed cluster file system. You can run it on PC-Engine APU hosts with 4GB RAM. For the OSDs, put in a mSata HD of 1TB or 2TB. Chose at least three OSDs and thre manager nodes. You cannot run OSDs and Managing nodes on the same device, because 4GB RAM is not enough, but you can run MON, MGR and MDS server on the same node.

2021 CephFS OSD Desaster

Wacky Initial Setup

My CephFS initially ran on three PC-Engines with 4GB RAM, where all had a 1TB mSATA SSD and should run as OSD that provides the disk to the cluster. In addition, one was setup as MGR, MON. MDS metadata and monitoring server, but for these two duties, 4GB RAM is not enough. So I initially fixed the problem by restarting the OSD on the management host every hour. This way, it was more or less stable. Later in 2020, I stopped the OSD on that host, lost one of three redundancies, but got a stable system. I then bought four more devices, three together with a 2TB mSATA SSD from AliExpress each, and one as separate monitoring server.

First OSD Fails

Unfortunately, before I had the time to add the new nodes to the network, there was a power failure, the UPS could not catch, and after rebooting, the BlueStore in one of the remaining two OSDs was corrupt. With only one OSD left, the full filesystem degraded and was offline. So I added the third OSD again, then the recovery started in this constellation on Monday and finished on Thursday. But all data was back, the filesystem up and running again.

Second OSD Fails

But when I then tried to add the new hosts, I learned, that the were incompatible: The old nodes run on Ubuntu 18.04 that comes with Ceph 12 Luminous, the new already on Ubuntu 20.04 with Ceph 15 Nautilus. So they were incompatible and could not talk to each other. In a first step, I upgraded the old Ceph installations to 14 Octopus, but they were still incompatible. Unfortunately, in the upgrade process, one of the remaining two OSD corrupted, one succeeded, one failed. And I was in the same position, as one week earlier, only one OSD left. So I downgeaded the new hosts to Ubuntu 18.04, upgraded to Ceph 14 and added one of the new OSDs to get back to a factor two. The recovery started once again on Monday and finished on Saturday. During the week, I added the remaining hosts to get full redundancy.

Problem Solved?

Currently, one OSD node is still broken, so five of six OSDs are now running, In addition, I bought two additional hosts to also run the management servers in redundancy. Now the system is up and running and stable, with enough redundancy.

The learnings from this: Never run less than three OSDs, and run the monitors on a separate device, or even better also on three devices. Replace a failed OSD immediately, before the whole system degrades.

2021 CephFS MDS: Five Month to Recover

Update on 2021/10/22: Since Wednesday the services are finally fully back, after a downtime of five month due to a recovery of the CephFS Meta Data Server. Our mail server was hosted on an external provider since years. This configuration was still a classcial setup, no dockerisation, no cloud. Just an installation of postfix and dovecot on a dedicated server with encrypted hard disks. That worked well, but then, after a power outage, the hard disk could no more decrypt. So I decided to restore the backup into the CephFS. Unfortunately, the 4GB RAM per machine were just enough for the normal workload. But when I unpacked a backup of about 50GB mails, the filesystem completely screwed up. Then the MDS was in recovering state. That used too much memory on the OSDs and on the MDS, so that they  crashed and restarted after a couple of minutes. I tried to recover that way, but iiit didn’t finish after a week, not after two, not after three. Since I could not add more RAM to PC-Engines, I bought 4 HPE MicroServer Gen10 Plus servers with a simple fast USB Stick for the Ubuntu operating system, 3 as OSD with 8GB RAM and a Western Digital 10TB harddisk each, and one as MON, MGR and MDS with 64GB RAM. They were delivered begin of September. The OSDs are fine, the recovery of the MDS was successful, but the rejoin state again used too much memory: Every 4min the server crashed. Unfortunately, the HPE MicroServer has only two slots for max. 16GB RAM each. Finally, I abused my LizardFS master server which has 160GB RAM as an additional MDS server. With that configuration, recovery was completed over night!

Learnings

CephFS is stable enough to recover from this kind of disasters  Add enough RAM! The cheap PC-Engines with 4GB RAM are not enough. 8GB RAM seem to be enough for an OSD with 10TB harddisk. 64GB RAM is normally enough for MON, MGR and MDS in normal operation, but not necessarily in during disaster recovery. Since for MDS only one server is running and the others are standby, adding just one MDS with high memory during disaster recovery solves the problem. For the MDS and all other services, add a memory limit short below of your system memory, e.g. MemoryLimit=55G in section [Service] of /lib/systemd/system/ceph-mds@.service.

Later I’ll add one or two more manager nodes and eventually three more OSDs to expand the storage.

Current Status and Recommendation

So my current stable cloud runs 10 dedicated Docker Swarm nodes, one manager and nine worker, and is backed by a five node CephFS, two manager and three OSDs. For setting up all these nodes, I use Ansible. All in all, there are 19 PC-Engine nodes, 3 HP ProLiant, 4 HPE MicroServer Gen 10 plus, a large HP and a Dell. Only my huge amount of multimedia data, terabytes of scanned documents, family photos and home videos, is stored in LizardFS, all other data is now stored in CephFS:

Development

Write a Common CSS Style Library

As a company that creates various products and services, mostly web applications and web based services, it is very important for Pacta Plc to have clear company identity with common look and feel in all our products and public appearances. Therefore our first step was to get official company corporate brand identity guidelines, a so called corporate identity CI. After having received our guidelines, the same designer was hired for creating a landing page. The result is what you now can see as our Pacta.Swiss corporate page. What the designer delivered, was only a sketch of the final result, which had to be implemented in HTML and CSS. Pacta styling follows best practices:

  • Pure CSS3 + HTML5.
  • No JavaScript for the basic layout. JavaScript is used in the basic design only to obfuscate the email address.
  • Clear separation of styling and structure.
  • All dimensions are relative to context (%), font (rem, em, ex) or browser size (vh, vw).
  • No absolute dimensions (no px allowed).
  • Initial font size is not defined, so the user’s configuration is respected.
  • No inline styling in HTML elements (no style=).
  • Styles are attached to HTML by element name or class.

Basic technical decisions:

  • Build environment is npm.
  • CSS is generated using Stylus processor.
  • Supported development environment is Linux only.

Initial Project Setup

We created an project pacta/style, that contains a file package.json and a folder for fonts, images, scripts and stylus.

package.json

The file package.json just holds the basics for CSS from Stylus:

  • A script npm install to install Stylus.
  • A script npm run-script build to build CSS.
  • A script npm start to rebuild when a file changed . inotifywait is a Linux tool to monitor file system changes.
{
  "name": "pacta-style",
  "version": "1.0.0",
  "dependencies": {
    "stylus": "^0.54.7"
  },
  "scripts": {
    "build-css": "stylus -c stylus/ --out css",
    "run-css": "while inotifywait -qq -e modify -r style/stylus; do npm run build-css; done",
    "build": "npm run build-css",
    "start": "npm run build-css && npm run run-css"
  }
}

All Stylus sources are in directory stylus and CSS targets are generated to directory css. This pacta/style project is included as git submodule in all other projects.

root.styl

To get a consistent look and to keep it easy to change basic settings, there are CSS variable definitions e.g. for the color palette, for basic spacing,  for the border style or for the shadow definition.

:root
    --blue100 #002b5e
    --blue90 #013466
    --blue80 #034072
    --blue70 #034b7c
    --blue60 #045a89
    …
    --border 0.1em solid var(--blue100)
    --shadow 0 0.25rem 0.25rem 0 rgba(0, 0, 0, 0.14),
        0 0.5rem 0.1rem -0.25rem rgba(0, 0, 0, 0.12),
        0 0.1rem 0.75rem 0 rgba(0, 0, 0, 0.2)
    …

grid.styl

The styles define all objects in all resolutions based on element name or class, such as grids or cards:

.grid2, .grid3, .grid4
  --grid-size 1fr
  display grid
  grid-template-columns: repeat(var(--grid-columns), var(--grid-size))
  grid-auto-rows: min-content 
.grid2
  --grid-columns 2
.grid3
  --grid-columns 3
.grid4
  --grid-columns 4
@media all and (max-width: 120rem)
    .grid4
        --grid-columns 2
@media all and (max-width: 80rem)
    .grid2
        --grid-columns 1
@media all and (max-width: 60rem)
    -grid4, .grid4
        --grid-columns 1

card.styl

.card
    display: grid
    grid-template-columns: auto 1fr
    border: var(--border)
    shadow: var(--shadow)
    width: calc(100% - 2em)
    .icon
        background-color: var(--blue100)
        width: 3rem
        height: 3rem
        border-radius: 50%
        svg, object, img
            width: calc( 100% - .2em )
            height: calc( 100% - .2em )
    > .heading
        background-color: var(--heading-bg)
        &, h1, h2, h3, h4, h5, h6
            color: var(--heading-color)
    .content
        display: flex
        flex-flow: column nowrap
        margin: .5em
        width: calc(100% - 1em)

The Landing Page

Our company landing page is Pacta.Swiss, where the company and its products are introduced. This is implemented as a static HTML page using the generated CSS. In fact, two pages, in English and German. The matching language is set from the browser through HTTP content negotiation by an Nginx server. This page’s implementation looks like:

  <body>
    <header>
      <div class="logo">
        <img src="style/images/logo.svg" alt="" /><span>Pacta AG</span>
      </div>
      <div>
        <nav class="social">
          <a>…</a>
          <a>…</a>
        </nav>
      </div>
    </header>
    <main>
      …
      <div class="container">
        <h2>…<span class="subtitle">…</span></h2>
        <div class="grid6">
          <div class="card">
            <div class="icon"><svg>…</svg></div>
            <div class="content">
              <h3>…<span class="subtitle">…</span></h3>
              <p>…</p>
              <div class="bottom"><a>…</a></div>
            </div>
          </div>
          <div class="card" disabled>
            <div class="icon"><svg>…</svg></div>
            <div class="content">
              <h3>…<span class="subtitle">…</span></h3>
              <p>…</p>
              <div class="bottom"><a>…</a></div>
            </div>
          </div>
          …
          </div>
        </div>
      </div>
      <div class="to-inverse" />
      <div class="inverse">
        <div class="container">
          <h2>…<span class="subtitle">…</span></h2>
          …
        </div> 
        …
      </div>
    </main>
    <footer>…</footer>
  </body>

React Components

Our software consists of Progressive Web Applications written in ReactJS. So we need a react component library. For this, we simply created another git project pacta/components that only contains a large amount of JavaScript React Component files and is included as git submodule into all development projects. Based on the work above, it is very easy to implement React Components, just define the parameters and return the necessary HTML structure.

Grid.js

This is the full definition of our grid layout, where you can specify size as the maximum number of grid columns. The actually shown number of grid columns depends on the browser width, as defined in the CSS you see in the snipped above:

import React from 'react';
import PropTypes from 'prop-types';

export default class Grid extends React.PureComponent {
  static propTypes = {
    children: PropTypes.oneOfType([
      PropTypes.array,
      PropTypes.object,
      PropTypes.string
    ]),
    size: PropTypes.oneOfType([PropTypes.string, PropTypes.number]),
    type: PropTypes.string,
  };
  render = () => (
    <div
      className={
        'grid' +
        this.props.size +
        (this.props.type ? ' ' + this.props.type : '')
      }
    >
      {this.props.children}
    </div>
  );
}

Card.js

A card may have an icon and a heading:

import React from 'react';
import PropTypes from 'prop-types';
import MdiIcon from '@mdi/react';

export default class Card extends React.PureComponent {
  static propTypes = {
    children: PropTypes.oneOfType([
      PropTypes.array,
      PropTypes.object,
      PropTypes.string
    ]),
    type: PropTypes.string,
    icon: PropTypes.oneOfType([PropTypes.string, PropTypes.object]),
    heading: PropTypes.oneOfType([PropTypes.string, PropTypes.object])
  };
  heading = () =>
    typeof this.props.heading === 'string' ? (
      <h2>{this.props.heading}</h2>
    ) : (
      this.props.heading
    );
  render = () => (
    <div
      className={
        'card ' + (this.props.type || '') + (this.props.icon ? '' : ' noicon')
      }
    >
      {this.props.icon ? (
        <div
          className={'icon' + (this.props.type ? ' ' + this.props.type : '')}
        >
          {typeof this.props.icon === 'string' ? (
            <MdiIcon path={this.props.icon} />
          ) : (
            this.props.icon
          )}
        </div>
      ) : this.props.heading ? (
        <div className="heading">{this.heading()}</div>
      ) : (
        <></>
      )}
      {(this.props.children || (this.props.heading && this.props.icon)) && (
        <div className="content">
          {this.props.heading && this.props.icon ? this.heading() : <></>}
          {this.props.children}
        </div>
      )}
    </div>
  );
}

Usage Example

As a usage example for the above samples, here is a snippet from the landing page on Pacta.Cash:

class LandingPage extends React.Component {
  …
  render = () => (
    <>
      <StepsToCoin current={this.props.current} />
      <Container>
        <h2>
          {this.props.t("landingpage.titlewhy")}
          <span className='subtitle'>
            {this.props.t("landingpage.subtitlewhy")}
          </span>
        </h2>
        <Grid size='4'>
          <Card icon={this.FAQ}>
            {this.props.t("landingpage.wheretouse")}
            <p className='bottom'>
              <button disabled>{this.props.t("landingpage.more")}</button>
            </p>
          </Card>
          <Card icon={this.FAQ}>
            {this.props.t("landingpage.investment")}
            <p>
              <img src={ChartImage} alt='Ethereum chart of one year' />
            </p>
            <p className='bottom'>
              <button disabled>{this.props.t("landingpage.more")}</button>
            </p>
          </Card>
          <Card icon={this.FAQ}>
            {this.props.t("landingpage.privacy")}
            <p className='bottom'>
              <button disabled>{this.props.t("landingpage.more")}</button>
            </p>
          </Card>
          <Card icon={this.FAQ}>
            {this.props.t("landingpage.independence")}
            <p className='bottom'>
              <button disabled>{this.props.t("landingpage.more")}</button>
            </p>
          </Card>
        </Grid>
      </Container> 
      …
  }
}

WordPress Template

Last but not least, our blog is written in WordPress, so Pacta also needs a WordPress template in the same style. Here we do the same, as with the React Component library, only that the template is now written in PHP instead of NodeJS.

wordpress.styl

There is only a very small additional Style file for WordPress specific definitions. All other definitions are comonnly shared:

html body #wpadminbar
    height: 46px
    width: 100%

.wp-type
    margin: 0 1em
    display: flex
    flex-flow: row nowrap
    justify-content: space-between

index.php

A WordPress template requires at least an index.php file, so let’s show this as an example:

<?php get_header() ?>

<?php if (have_posts()) : while (have_posts()) : the_post(); ?>

<?php if (has_post_thumbnail()) : ?>
<div class="cropped-image">
    <?php the_post_thumbnail('full') ?>
</div>
<?php endif ?>

<div class="wp-type">
    <div>
        <?php the_category(' ', ' → ') ?>
    </div>
    <div>
        <?php the_tags('', ' ', '') ?>
    </div>
</div>
</div>
<div class="container">
    <article>
        <h1><?php the_title() ?></h1>
        <?php the_content() ?>
    </article>
</div>

<?php endwhile; ?>
<?php endif; ?>
<?php get_footer() ?>

Pacta PagesServices and Pages by Pacta AG

Pacta.Cash

This is the easiest crypto wallet on the market. Manage your Ethers and Bitcoins securely without having to understand the technical details. You own the keys, all data is stored on your device. Trade without registration.

Pacta.Swiss

Company representation page of the Swiss Pacta Corporation Pacta Plc. This page is provided by Pacta Plc (in German: Pacta AG).